Pages

.


.


Showing posts with label Appetizers. Show all posts

Easy and Delicious Appetizers

Most of the people order takeaway appetizers for house parties. But the truth is that you can make some delicious and yummy appetizers and this is not going to take a lot of your time. As a matter of fact these appetizers will be winners at your party and are also healthy and nourishing. Most of the appetizers you buy from the shop have a lot of cheese, all-purpose flour and are deep fried in oil. When you make them at home you can be sure about the ingredients and their health benefits. You can add your own personal touch to the party by making your own delicious appetizers. Here are some ideas.

Homemade Grilled Prawns

Ingredients

Extra virgin olive oil - 2 tablespoonsCrushed garlic - 2 clovesBread crumbs - 1/2 cupSeafood seasoning - 1/2 teaspoonUncooked prawns (Peeled and deveined ) - a poundSeafood cocktail sauce

Directions for making these delicious appetizers

Combine olive oil and crushed garlic cloves in small bowl and make it stay for half an hour.Combine the bread crumbs with seafood seasoning and mix well.Dip the prawns, one at a time in the olive oil-garlic mix, and bread them in the bread crumbs.Now thread the prawns onto metal skewers. Grill the prawns, covered, in medium heat for 2-3 minutes or till they turn pink. Serve with seafood sauce.

Cherry tomato and basil bruschetta

Ingredients

cherry tomatoes - 6 or 7baguette French bread or similar fancy bread- 1olive oil - 1/4 cupgarlic - 2 cloves mincedvinegar - 1 teaspoonbasil leaves, chopped - 6 - 8salt, to tastecrushed black pepper, to taste

Directions for making these delicious appetizers

Blanch the cherry tomatoes in hot water, remove the skin and seeds and chop.Mix the chopped tomatoes with garlic, chopped basil leaves, olive oil and vinegar in a bowl. Add pepper powder and salt to taste.Slice the baguette bread into half-inch thick slices. Brush them with the olive oil and rub with minced garlic cloves and bake them at 250 degree Celsius, till they turn golden brown in color.Take them away from oven and serve with the tomato- basil mixture on top. Do this just before serving the Bruschetta; and then serve immediately. These delicious appetizers can be eaten without any dip sauce.

Fried Onion Rings

Ingredients

Large onions - peeled, and sliced into 1/2-inch thick rings - 2Buttermilk - 2 cupsSalt, to tasteBlack pepper powder, to tasteFlour - 1 1/4 cupsCorn flour - ¾ cupOil - 3 cups for frying

Directions for making these delicious appetizers

Combine the buttermilk with salt and pepper. Dip the onion rings in this mixture and keep for half an hour.Combine the all-purpose flour and corn flour with salt and pepper. Keep aside.Pick the onion rings from the buttermilk marinade, coat in the flour - corn flour mixture and fry in hot oil. Serve these hot immediately with ketchup.The Danish term for delicious appetizer is l?kre forretter . To see a few more other great recipes for meal starters, please visit this website: isabellas.dk . Rate this Article

Easy and Delicious AppetizersNot Rated Yet

Sjef Jens has published 14 articles. Article submitted on August 16, 2013. Word count: 447

Mealtime is a wonderful time to be shared with your family. These days, due to our busy lifestyles, it's not always easy to find time to enjoy a home cooked meal together.

Written by: Chris Harmen

Cooking utensils must be chosen with great care to do an easy and quicker cooking. The main factors that influence the selection of domestic cook wares are resistant to scratch, handiness, easy to wash and easy to cook.

Written by: Maria Emery

Serve your family a hearty meal such as turkey meatloaf. The delectable taste of this meat recipe will surely appeal to your discriminating taste buds. Check out these easy and delicious recipes for turkey meatloaf.

Written by: Angelica Florin

Next time you have some chicken on hand, before you cut celery into it and mix it with mayo, try some delicious alternatives that will make your family mad for chicken salad.

Written by: Torri Myler


This post was made using the Auto Blogging Software from WebMagnates.org This line will not appear when posts are made after activating the software to full version.
reade more... Résuméabuiyad

Duo of Roasted Carrot and Parsnip Soup Shooters

Inspiration comes from the oddest places sometimes.  One day last week, one of my sons missed the bus.  Ughh!  Haven't we all been there?  So Lily and I had to really hustle to load up and get him to school on time (yes, in pajamas).  Did I mention it was super cold, dark, blustery and raining?  Anyway, on the way there, Lily started talking about farmers.  We were discussing all the reasons why they are so important to us, and all the wonderful products that they bring us.  When I mentioned growing carrots, the next thing that popped out of Lily's mouth was... "And don't forget parsnips!  Carrots AND parsnips!"  I suppose that I roast these two together so much (see my Roasted Carrots and Parsnips) that my kids automatically think of this duo as a natural team.   I should also mention that when the weather is cold and miserable, I have been conditioned since childhood to think of having a nice comforting soup.  So at her suggestion, a little light bulb in my brain yelled "YES!  Roasted Carrots and Parsnips.... in a soup!  Let's do this!!"  And now here we are!

At the risk of having a boring soup, I have taken the liberty of making these a little more exciting!  So I am bringing you a Curried Roasted Carrot Soup with a Gingered Roasted Parsnip Soup.  Together, these flavors are evocative of the warm and exotic flavors of Indian cuisine.. creamy and rich, yet light all at the same time.  This duo would make an excellent appetizer soup as a first course for a dinner party.  Don't worry, they aren't spicy... just yummmmm!  Yes, parsnips can be a little spicy, but the roasting makes both the parsnips and the carrots so wonderful and sweet.


Curried Carrot Soup -
  • 4 cups chopped carrots
  • 3 sprigs fresh thyme, stripped from stems
  • 3 cloves garlic
  • EVOO + kosher salt + pepper for roasting
  • 1/4 cup onion, chopped fine
  • 1/6 cup celery, chopped fine
  • 3/4 tsp curry powder
  • 1/4 tsp kosher salt
  • 2 cups chicken broth
  • 1 cup water
  • 1/2 cup half and half
Gingered Parsnip Soup -
  • 3 cups parsnips, peeled and sliced
  • 3 sprigs fresh thyme, stripped from stems
  • 3 cloves garlic
  • EVOO + kosher salt + pepper for roasting
  • 1/4 cup onion, chopped fine
  • 1/6 cup celery, chopped fine
  • 1 1/2 tsp fresh ginger, peeled and finely minced
  • 1/4 tsp kosher salt
  • 2 cups chicken broth
  • 1 cup water
  • 1/4 cup half and half
Garnish for both -
  • light sour cream (or plain Greek yogurt)
  • fresh dill sprigs
Step-by-Step:

Prep - This part can be done in advance, with the roasted veggies being stored in the refrigerator.  Peel and cut the carrots and parsnips into about 1/4" pieces.  Season them with some EVOO, kosher salt, and black pepper.  Add whole garlic cloves and some fresh thyme leaves to the sheet pan.  Roast them all together for about 30 minutes at 400 degrees F.  They should be soft with a slightly caramelized edge, and taste sweeter.  Not only the carrots and parsnips will be sweeter, but also the roasted garlic.  Roasting takes the "bite" out of it, making it way more mellow.
4 cups carrots, peeled and sliced into 1/4" pieces
3 cups parsnips, peeled and sliced into 1/4" pieces
You may want to rotate the pans halfway through.  My pans were too large to put both of them on the same level.

Now to put the soups together -

Saute the onions and celery in butter in a saucepan.  This will be base for both, so you can do it together and split them, or do them separately.  I sauteed the onions and celery together before separating them.
3 Tbsp butter (or 1 1/2 Tbsp to each pot)
1/2 cup onion (or 1/4 cup to each pot), diced
I always keep chopped celery in the freezer.  It's so convenient!
1/3 cup total (1/6 cup to each) of chopped celery. 
 
At this point, if you have sauteed the veggies together, separate them into two pots.

For the parsnip soup, add fresh ginger that has been peeled and finely minced.
1 1/2 tsp ginger, peeled and finely minced
For the carrot soup, add the curry powder.
3/4 tsp curry powder added to the pot for the carrot soup
Allow those flavors to marry together with the sauteed vegetables a few minutes, then deglaze with chicken stock.   You could easily make this vegetarian by using a vegetable stock if you wish.
2 cups chicken broth added to each pot


Add the roasted vegetables to the appropriate pots.  Season with a bit of salt and let them cook about 5 minutes.  All we are doing here is allowing all the flavors to come together.  The veggies are already done.  
Add the roasted veggies to each pot, respectively
1/4 tsp kosher salt added to each pot
Curried Carrot
Gingered Parsnip
Now - time for some fun!  
Add the contents of the soup (one at a time), to a food processor.   You could also use an immersion blender to do this right in the pot.  You could use a blender, but please be very careful and let the soups cool first if you do.  Hot soup in a blender can be an explosive situation.  Take it from me!   Process until smooth.  Add the water to thin it.  You could also add the water once you put the puree back in the pot if you are using a food processor with a smaller bowl.
curried carrot soup
1 cup water added to each
Repeat for the other soup.
gingered parsnip soup
return the purees back to their pots.
For the final touch, add the half and half to each pureed soup.  Adjust seasonings as you see fit.
1/2 cup half and half to the carrot soup
1/4 cup half and half to the parsnip soup
This soup can be served hot or cold.  Your choice.  To make the "duo" as I have, pour each one at the same time into your shooters or bowl from opposite sides (at the same rate, obviously).  Garnish with a dab of sour cream and a fresh sprig of dill.  That big of tangy, creamy sour cream really brings this soup up a new level!
I also sliced up a baguette of French bread, then buttered and toasted them up in a griddle pan to serve along with the soup.  If you are serving the soup in a bowl, these are great for "dunking" in the soup!
Of course you can serve the soup in a bowl, too!

I hope you have enjoyed this recipe. 
If you are curious as to what else I have up my sleeve, pop on over to my Recipe Index to go shopping for some more great recipes!


Connect with me.
If you haven't already, click here to subscribe to MenuMusings so you won't miss a thing!  I'll send you notifications of new recipes so you can cook along!  You can also follow me on Pinterest as well as on the MenuMusings facebook page. 


Here are some bonus recipes for you.     


reade more... Résuméabuiyad

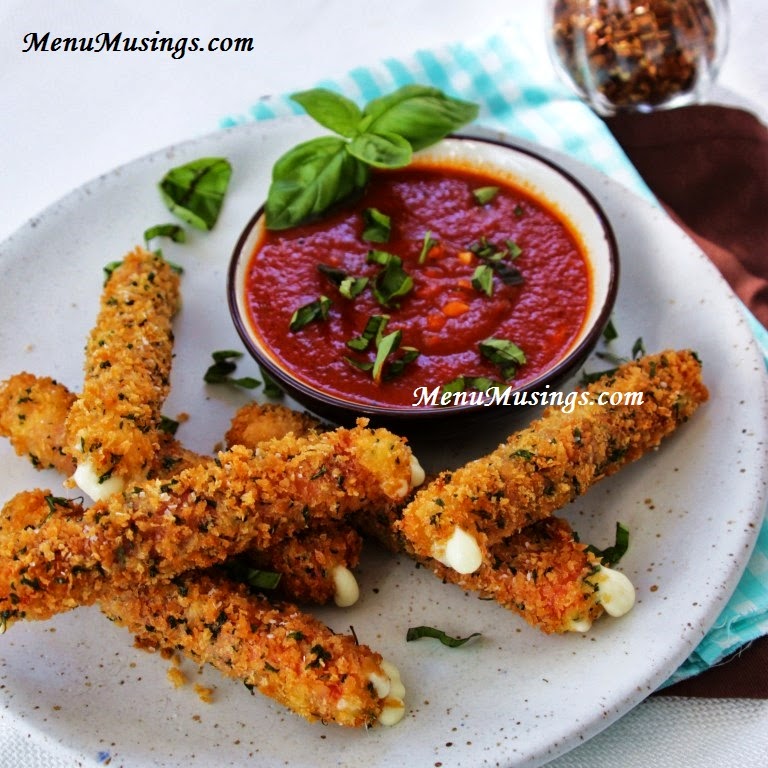
Prosciutto Wrapped Mozzarella Cheese Sticks with Spicy Marinara

You all know I have a weakness for anything to do with melted cheese.  I just do.  Today, I had a craving for fried cheese sticks.... like the kind I have had at countless restaurants over the years.  But this was a stay at home with the family watching football sort of day, so I figured I would just make my own.  

So I got to thinking about this, and EVERYone does the basic mozzarella cheese sticks.  How could I make these more interesting?  How could I invite the tastes, textures, and smells of Italy into my kitchen?  Then it hit me - maybe I'll wrap the mozzarella in thin, delicate sheets of prosciutto first.  Then came the question of the dip.  In my humble opinion, you MUST have a dip!  You could, of course, open a jar of marinara or something.  But marinara is super simple to make, so let's just go with the homemade option.  That way, I can make it exactly the way I want it. 


Print this recipe!

Ingredients:  

Cheese sticks -  
  • 1 package of mozzarella string cheese
  • 1/2 cup all purpose flour
  • 1/2 tsp Emeril's Essence seasoning
  • 2 eggs, beaten
  • 1/4 cup milk
  • 1 1/2 cups Panko bread crumbs
  • 1 Tbsp dried parsley flakes
  • canola oil for frying
Spicy marinara - 
  • 1 (15 oz) can tomato sauce
  • 3 large cloves of garlic, chopped fine
  • 1 Tbsp extra virgin olive oil
  • 1/4 tsp crushed red pepper flakes
  • 1 tsp Italian seasoning
  • 1/4 tsp kosher salt
  • 1/4 tsp black pepper
  • 1/4 tsp sugar

Step-by-Step:

Marinara - 
Let's start on the marinara, since that will take the longest.  It's quick to put together, but the longer you let it simmer, the better it tastes.

Lots of times, we start things off with hot oil, but not this time.  We will add the minced garlic to the COLD oil.  This way, the garlic will open up and flavor the oil more. 
1 Tbsp extra virgin olive oil
3 cloves garlic, finely minced
Bring the heat up to a medium or so and let the garlic saute until it starts to develop a hint of color and becomes fragrant.  Please don't just turn up the heat and walk away.  Burnt garlic is yuck!
Now add the tomato sauce.
1 (15oz) can tomato sauce
While the sauce is starting to come up to a simmer, lets season it up!
1 tsp Italian seasoning blend
1/4 tsp crushed red pepper flakes, 1/4 tsp kosher salt.
1/4 tsp black pepper, 1/4 tsp sugar
Let once it comes up to a nice bubble, just put it on a back burner somewhere on low and let it simmer away quietly.  Stir it every once in a while.  I let mine go for probably 45 minutes while I was doing other things.  You will notice that it reduces quite a bit.  That's fine!

The cheese sticks - 
While the marinara is simmering, lets "build" the cheese sticks.  I made a three part breading station.

1.  1/2 cup All purpose flour + 1/2 tsp Emeril's Essence
2.  2 eggs, beaten + 1/4 cup milk
3.  1 1/2 cups Panko bread crumbs + 1 Tbsp parsley flakes.
Get them all lined up.
Now we are ready for the actual cheese part.  This breading station will accommodate about 16 sticks of mozzarella cheese.  They come individually wrapped, so obviously you need to unwrap them first.
 
See how paper thin and delicate the prosciutto is?  You can see my fingers through it.
At a slight angle, I wrapped the cheese sticks in the proscuitto.  This will help to keep the cheese from exploding in the hot oil, and give a different twist to the flavor profile.
Here we have it.  The prosciutto is quite sticky, so you shouldn't have any problems getting it to stick to itself.
Now the messy part.  (Not my favorite part)

Dip in 1. flour, 2. egg, 3. bread crumbs.
For the bread crumbs, really push the cheese into the bread crumbs hard.  Set them out on a baking sheet.  After you have all of them breaded, put them in the freezer for at least 30 minutes.
When you are ready, fry them for about one minute in hot canola oil.  I set the fryer to 365 degrees F.  I would only do a few at a time.  If you crowd the basket, 1- you will lower the oil temperature too much, and 2- your cheese sticks may stick together giving you a cheese blob!

Allow them to drain on a paper towel lined tray or plate.  Typically, you salt your fried stuff immediately after taking it out of the oil.  That's fine here, too... but just be forewarned, the prosciutto will add a lot of salt on its own, so go easy on the salt if you do add it.
Enjoy them immediately with the marinara.  I chopped a little fresh basil over the top to garnish.
Can you tell how crunchy this crust is? And the addition of the parsley makes it just gorgeous.
The prosciutto helps to keep the cheese from exploding.  Well, not really EXPLODING, but it does hold it in during the cooking process more than if you didn't have it.  See how lovely and gooey it is?


I hope you've enjoyed this fun recipe.  I have lots more on my Recipe Index!  

Connect with me!
If you haven't done so already, Click here to subscribe to MenuMusings.  You can also Follow me on Pinterest and on my MenuMusings Facebook page.

Here are some bonus recipes for you.
Oriental Cole Slaw

Fire Roasted Corn Guacamole

Mediterranean Chicken Pasta
Spicy Garlic Shrimp

Gorgonzola Cream Sauce for your Steaks

Chicken Molcajete

Caprese Burger

Spinach and Apricot Stuffed Pork Tenderloin

Peanut Butter Cups - Just like Reese's

Written Method:

Marinara - 
Let's start on the marinara, since that will take the longest.  It's quick to put together, but the longer you let it simmer, the better it tastes.  Lots of times, we start things off with hot oil, but not this time.  We will add the minced garlic to the COLD oil.  This way, the garlic will open up and flavor the oil more.  Bring the heat up to a medium or so and let the garlic saute until it starts to develop a hint of color and becomes fragrant.  Please don't just turn up the heat and walk away.  Burnt garlic is yuck!
Now add the tomato sauce.  While the sauce is starting to come up to a simmer, lets season it up! Add in the the crushed red pepper flakes, kosher salt, black pepper, sugar.  Let once it comes up to a nice bubble, just put it on a back burner somewhere on low and let it simmer away quietly.  Stir it every once in a while.  I let mine go for probably 45 minutes while I was doing other things.  You will notice that it reduces quite a bit.  That's fine!

The cheese sticks - 
While the marinara is simmering, lets "build" the cheese sticks.  I made a three part breading station.
1.  1/2 cup All purpose flour + 1/2 tsp Emeril's Essence
2.  2 eggs, beaten + 1/4 cup milk

3.  1 1/2 cups Panko bread crumbs + 1 Tbsp parsley flakes.
Get them all lined up.

Now we are ready for the actual cheese part.  This breading station will accommodate about 16 sticks of mozzarella cheese.  They come individually wrapped, so obviously you need to unwrap them first.
At a slight angle, I wrapped the cheese sticks in the proscuitto.  This will help to keep the cheese from exploding in the hot oil, and give a different twist to the flavor profile.  The prosciutto is quite sticky, so you shouldn't have any problems getting it to stick to itself.

Now the messy part.  Dip in 1. flour, 2. egg, 3. bread crumbs.  For the bread crumbs, really push the cheese into the bread crumbs hard.  Set them out on a baking sheet.  After you have all of them breaded, put them in the freezer for at least 30 minutes.  When you are ready, fry them for about one minute in hot canola oil.  I set mine to 365 degrees F.  Allow them to drain on a paper towel lined tray or plate.  Enjoy them immediately with the marinara.  I chopped a little fresh basil over the top to garnish.
reade more... Résuméabuiyad